I can't take credit for the idea on this one. My inspiration first came from Young House Love, when they shared how they added a drum shade to one of their existing lights. I didn't have the same type of light they had with that handy finial on the bottom, but it got my wheels turning. I went out in search for a shade but couldn't find one that was large enough for a reasonable price. As luck would have it, Sherry and John soon shared a blog by a handy gal who made a beautiful drum shade for her dining room. Her tutorial seemed easy enough to follow so I got to work (my tutorial deviates slightly).
1. I found an 18 inch embroidery hoop at Joann Fabrics and after a 40% off coupon it was only $2.62. I chose to buy only one, figuring I could use the two wooden pieces for the top and bottom of the shade. The burlap came from Ben Franklin's (since Joann's was out of that warm caramel color) and while it was quite a bit pricier ($6.29/yd vs. roughly $2/yd at Joann's) I had a store credit. I bought 2 2/3 yds. because I would need 58 inches of fabric to cover the hoops.
2. I removed the screws on the hoops and used a butter knife to work the wooden block off of the hoops. It didn't take long, but I tried to be very careful because the hoops are a bit fragile.
3. I glued the ends together using a dab of hot glue.
4. I wanted a 9 1/2 inch tall drum shade (to allow room for the door to swing open without hitting it). I allowed an extra inch on each side for overlapping and cut a long strip of burlap at 11 1/2 inches wide.
5. I couldn't find plexiglass or overhead sheets anywhere so I decided to use 80lb card stock I had on hand to make the shade stable. I taped 6 sheets end to end (not overlapping) to make one long piece and trimmed the excess.
6. I attached the top and bottom hoops to my paper strip using hot glue. Here's where I should have stopped to rework one part. Because the embroidery hoops were slightly different sizes, there was a taper to the shade and the paper did NOT want to cooperate. I should have gone back and cut down the larger hoop just a tiny bit until it was the same size as the other. But being my silly self I forged ahead anyway, dents in the paper and all.
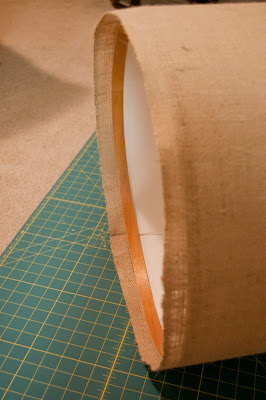
7. I attached the burlap to the shade using a line of hot glue around the wooden hoops, making sure to leave an even amount of overlap on both sides.
8. I folded the edges over and glued them down, making sure to pull tight so there weren't any wrinkles.
9. Once I was finished, I cut off the excess fabric, leaving just enough to fold over and glue down.
10. I had purchased some ceiling hooks and eye hooks to hang up the shade. I figured this was a great solution for apartment dwellers and home owners alike because the hooks cause very little damage and the holes are easy to fill in should you need to move.
Well, what I failed to take into account was the length of the hooks once the shade was hanging. Once I had it up I realized the door could freely bash into my new project however much it pleased. Whoops! So here is the "behind the scenes" shot of my remedy. The eye hooks had once been pointing upwards, so I turned them upside-down (I just used hot glue to attach them). The ceiling hooks were now too far off from the eye hooks and not wanting to re-glue anything or put more holes in the ceiling, I used some thin wire to attach the two.
12. All done! I'm happy about the fact that you can barely see the hooks coming down from the ceiling (even though the inside is a different story), and I love that the paper diffuses the light. A word of warning though, I would NOT use paper if your shade is going to be close to your lights because it could become a fire hazard. I made sure to test out the heat of the light over time, and thankfully the shade is large enough and enough heat escapes through the top that the paper stays quite cool.
In the future, I'd like to add a diffuser to the bottom made of white muslin to hide the mess going on inside, but I'll have to re-work the hooks so that the shade can easily be hung and removed. Since it's so close to the door, most people walk right past it without stopping underneath to inspect my cob-job anyway, so I'm ok with it. :)
I can see doing this again too, it was really easy and I have enough burlap leftover to make another.
Materials:
2 2/3 yds burlap = $11.49 (Yikes! But I had a $7.50 store credit)
1 Embroidery hoop = $2.62
Eye hooks - $1.09
Ceiling hooks - $2.18
Wire - approx $2
Total = $19.38 (Not bad for under $20 huh?)
If you buy burlap at Joanns and don't use wire to hang up your shade then this project should only cost about $10-15 (with muslin added in for a diffuser). For a shade that big? So worth it!


I love this! One of these days, I'm gonna have to actually follow one of your tutorials instead of reposting them on reddit, haha.
ReplyDeleteWhat a fabulous way to hide an unsightly light when renting an appartment. great idea for us stagers.
ReplyDeletethanks for sharing
Caroline