Sep 22, 2013

Upgrading Our Kitchen Pendant Lights

With so many big projects looming over our heads, we decided to take on a small one: upgrading our kitchen pendant lights. We both didn't care for the "beehive" lights we had so we set out to find something a little more industrial.


We were on a budget of $200 ($100 for each light). While searching the web for ideas, I came across this photo from Gunkelmans Interior Design via Houzz and immediately fell in love with the pendant lights.

The lights are called "Clark Mini Pendants" from Wilmette Lighting. The only problem was that each light was anywhere from $261 to $308, depending on where you looked (Amazon seems to have the best deal on these). Wayyyy over our budget. I looked around for a similar light and found this one from Nova 68 for $160. Better, but still out of our price range.


As luck would have it, we caught a break while shopping for other house stuff at Home Depot. This pendant was strung up at the end cap of the lighting aisle and we happened to walk by and take notice:


It's the Clear Glass Cylinder Pendant from Home Decorators Collection. At only $80 for each light, they fit nicely in our budget and they come with super cool Edison bulbs. But guess what? The lights don't come in black. I gave Neal a look of disappointment and shrugged. "We could paint them black?" I said, almost as a joke. I was surprised when he replied with "Hey, that might just work..." So we bought two.

Besides painting, we did a little extra modification on the new lights as well. The chords had several "wobbles" in them and we realized we would never get them to hang perfectly straight. I think the wobbly look can be pretty cool in the right space, but we wanted something a bit more clean-lined and substantial, a.k.a. a metal rod. I looked into several options but none seemed to be what we needed. Copper tubing was too heavy, pvc piping would probably look too cheap, and the metal extension rods for lighting I found online were either too short or they were the right size but were too expensive (about $25 for one rod). I'm sure there's a cheaper solution for this out there, but I finally settled on a 48" (extendable to 84") cafe curtain rod from Target for $15. The inside rod was the perfect diameter, and luckily it was a solid piece with no seam (some of their cafe rods look the same as this but do have a seam so if you ever want to do something similar be sure to check).


I needed to cut the rod into two equal pieces and wanted it to be even and clean so I bought a cheap junior tube cutter ($6) from Home Depot. The ends of the rod were nipped off first since they had parts inside for the curtain finials and then the rod was cut in two. Easy as pie and the tube cutter made nice, clean cuts.


Now it was time for paint. I gave the lights a light sanding before painting and used a primer to make sure the paint stuck. Zinsser Cover Stain Primer from Home Depot is one of my favorite primers and comes in a spray can for $6.

I wanted to make sure the lights would have the same finish/sheen on every piece so I decided to paint the curtain rod tubes too, even though they were already black.


Each piece got two coats of primer and two coats of Rustoleum black satin spray paint (I taped off the inside parts where the light bulbs would screw in to protect them).  Everything was going fine until the last coat of black. That's when the paint on the metal tubes decided to crackle in some spots. Ugh.


Centsational Girl has a really good spray paint FAQ post where she talks about all the things to keep in mind while spray painting anything. She mentions seeing this undesirable crackling effect when it's either 1) too cold out for painting, 2) the surface wasn't primed, or 3) the surface was not clean. I can safely say I had the first two covered (I was painting inside since our condo complex happens to have a room-temp "hobby room") and I had obviously primed the pieces, so that leaves me with #3. I'm guessing the cause of the crackling was my own oily fingerprints from handling the pieces. Rubber gloves might be a smart option for future. I had to wait a day and let the paint dry, then sand down the tubes and start over. After I finished the last coat of paint I let the lights dry for the rest of the day. I knew we would be handling them to put them up and definitely did not want to risk messing up the paint this time.


In the meantime we flipped the breaker and took down the old lights. Yay!


At first I tried selling them on Craigslist but after getting no takers I ended up giving them away for free. Oh well, I'm happy someone is getting a use out of them!


The new lights came with instructions for how to put them up, but if you are curious, here are some good directions. I couldn't take any photos of the process as we needed all hands on deck.


Voila!


We get a lot of compliments on these lights when we have guests over and the Edison bulbs are so moody, love them!

Cost breakdown:

Lights - $160
Curtain Rod - $15
Primer - $6
Tube Cutter - $6 
Black Spray Paint - Free (I had enough leftover from when I painted our fireplace)

Total = $187 (+ tax, so we were about $6 over our $200 budget, rats!)


Sep 7, 2013

DIY Stacked Stone Fireplace (First Remodeling Project Part 2)

Time slipped away from me again...oops! We got our fireplace project about 95% complete two months ago now and I love how it turned out!


The before and after photo is the condensed version of the project. If you feel like sticking around to see how we did it, just know that you're in for a ride (it's a long post!) The cost breakdown is at the bottom.

Here we go! (starting from where I left off on my last post)


After getting the old fireplace surround torn out, it was time to build in the new framing. We were able to re-use a lot of the old wood which helped cut costs a wee bit. Originally the fireplace box was sitting on the ground and we thought it would look better if it were raised up a bit. We also wanted the new fireplace surround to go all the way to the ceiling for a more modern/dramatic look. I still can't thank my dad enough for helping us with this!


See mantle piece clamped up above the fireplace? It came out of a 1930's house! We had been searching high and low for a mantle and most of the new ones we liked fell into the $300 range. Ouch! One of my dad's friends was doing demolition work on a 1930's house and was able to save the mantle. He heard we were looking for one and decided to gift it to us as a housewarming present. What a generous gift! It may have looked like a dirty piece of lumber at first, but it cleaned up quite well. It's solid as a rock and has a beautiful patina and tight grain (we think it's some type of maple).


Since it was so huge, we had to cut it down to make it work for our fireplace. Let me tell you, I winced through the whole cutting process. It just felt wrong to chop up something with so much history, even though it was being "recycled." But we had to do what we had to do and I'm happy to say I absolutely love how it turned out. 

Below: my dad and opa working together.


We had a chunk big enough to make a couple corbels so I got to work making a template and cutting them out (note: it's always a good idea to wear safety glasses when using any kind of saw. I didn't, which is just silly)


The "rough draft" mantle:


Jumping back to the framing, you may have also noticed a gray pipe sticking out.


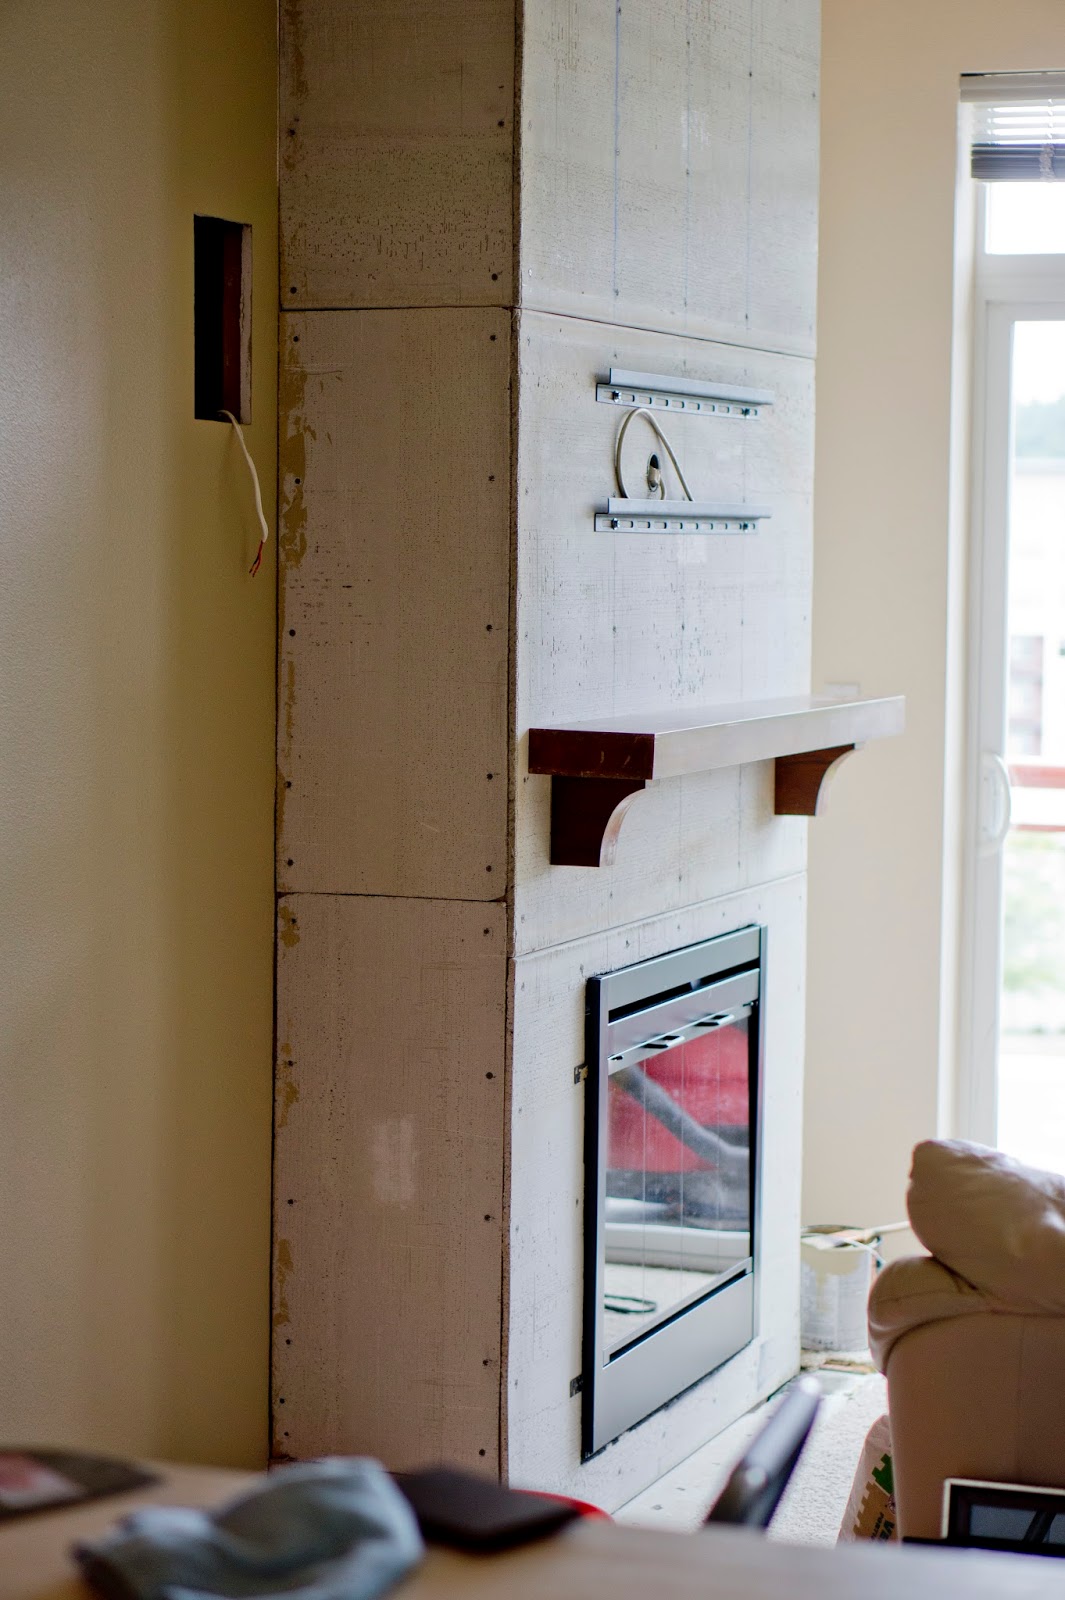
Since space is pretty tight in the condo, we decided ahead of time that we were going to mount our TV above the fireplace. We used 2" conduit for hiding cables that connect to the TV.


We drilled pilot holes for the mantle and then hung up Durok cement board. We left the sides open so we cold bolt in the mantle and corbels from the backside.We then hung up our TV wall mount and stained the raw pieces of the mantle to match the old color.

I also painted the fireplace box since it was pretty scuffed up from the previous owners. Thank you good ol' trusty can of satin black spray paint!

We hung up the TV to get the viewing angle right and make sure we would have enough room for the stone veneer behind it.


Our plan was to leave an empty space in the stone where the wall mount was, but we realized that the TV wouldn't cover up as much of the blank space as we thought it would. We took down the wall mount and cut off several inches so the stone would cover up more. The patch was also painted black to hide it better.


Now it was time to put up the stone veneer (Eldorado stone in Chapel Hill color). We went with a manufactured stone veneer because: 1) It was much cheaper than real stone but still looked pretty convincing. 2) It was about half the weight (meaning we could get by with just using cement board by itself instead of reinforcing it with metal lath, and 3) It comes in "tiles" which means wayyyyy less cuts to make. I bought a dry powder mortar, added water and stirred using a drill mixer attachment until the mortar was the consistency of peanut butter. You can learn from my mistake here: a little goes a long way. I made way too much on the first batch for what we could get done in a day and ended up throwing out a lot of it (which resulted in us going back to Home Depot buy another bag when we finished up the project the next weekend, doh!)


We rented a paver saw and set it up in the bathroom. I've never used any sort of tile/paver saw before so I was a bit nervous, but it turned out to be incredibly easy. The key was to go slow. I do wish I could have done the cutting outdoors, that thing makes a MESS! I remembered my safety goggles this time.


Before making cuts, I laid out the tiles around the fireplace to get the configuration right (although it appears an extra corner piece snuck into the photo...hmmm). Side note: we purchased hardwood floors a while back and will eventually tear out the carpet in this room. Since we knew what the thickness of the floors would be, we made shims out of scrap wood that were slightly thicker than the flooring and placed them around the fireplace. We also cut up some of the underlayment and added it as well. This ensures that we can get the floors underneath the stone in the future. 


Going up! Neal soaked down the cement board with a wet rag before spreading on the mortar so that the cement board wouldn't suck the moisture out of the mortar (which would weaken it). He also used a level to make sure that each row of tile was straight and used shims here and there to even out tiles that were wonky. Rubber gloves are definitely a must-have for this and we spent a couple extra bucks to get a stainless steel trowel with a rubber grip (it won't get rusty and it's definitely more comfortable to hold onto for an 8-hour work period!) 


Overall we had a pretty good routine going, I made all the cuts and Neal put up the stone. We found that the best way to get the tiles to stick was to put mortar on the wall AND back butter the tiles. If we had purchased a trowel with larger notches we possibly could have avoided doing both (here's another chance to learn from our mistakes!) but since we didn't feel like making the trip back to the store we used this method instead. So far the tiles haven't tried to jump off the wall so I think we're safe.


Closeup of the (dirty) wall mount area:

I was pretty pleased with how the wall mount area turned out. It's small enough to be hidden by the TV or if we go to sell/rent the condo in the future and someone doesn't want their TV above the fireplace, they can easily cover up the spot with some artwork or a mirror.


Done! Well... 95% done. We still need to paint the cut edges of the tile & any chips in the stone with the patch kit (you can't see it in the photo but the edges are a very light gray and stick out like a sore thumb in certain lighting conditions) and we need to do another pass at cleaning up drips from the mortar, both of which we'll will be working on today.


So, you might be wondering how much a project like this costs? For us it was about $1000, although we didn't have a lot of the tools needed to do the work and could have saved an extra $100 had I planned a bit more carefully. Definitely not a cheap project, but I do feel it makes a huge difference in the room (it makes it feel taller, which is a nice bonus). Here's an approximate breakdown of our costs:

$575 for the Eldorado stone veneer. We initially spent about $825, which included 20% extra sq ft of stone in case of breakage (which is pretty standard) but was also a bit extra because I forgot to subtract the sq ft area of the fireplace box when I was first figuring out how much stone we would need (dumb mistake). We didn't end up using two boxes and returned them for $250 in credit, but had to pay a restocking fee of $75).
$130 for two full days of paver saw rental
$45 for 3 bags of mortar (we could have saved $15 if I had not made too much mortar in the first batch)
$40 for a ladder (we didn't have one)
$210 for tools & other supplies (lumber for framing, conduit, cement board, screws, spray paint, stain & Old English for the mantle, the drill bit mixer attachment, a bucket, trowel, gloves, goggles, and anything else I may be forgetting)


P.S. We now have a (temporary) cabinet in the little alcove to the right for storing electronic components, although we eventually hope to find something with an industrial look. Also, in case you noticed the different paint colors on either side of the fireplace, I still have some painting left to do on the walls. Lots to keep me busy, that's for sure!


Apr 28, 2013

First Remodeling Project (Part 1)

I'm excited to share our first remodeling project at our new place. A short while ago I showed you a photo of the living room fireplace:


Technically there was nothing wrong with this fireplace other than it needed some touch-ups here and there. However, two weekends ago we got the itch to make some serious changes and decided the living room fireplace was a perfect candidate. It's an electric fireplace so we knew going in we wouldn't have to worry about gas lines or a chimney flue. We began by taking down the TV and wall mount:


Then I started removing the trim around the base:

Next came the mantle. My other half was visiting with his dad for the weekend and I was too antsy to wait for him to get back so I jumped at the chance to do a little demo work. I used two scrap 2x4's from Home Depot as a makeshift lever:


The mantle piece came off way easier than I thought it would. Phew! After taking off the remaining trim pieces, I started removing the tile using a small pry bar and a flat-head screwdriver. About halfway through I started thinking I was crazy to be removing perfectly good tile on a perfectly good fireplace and got up to take a break. I had left the screwdriver jammed into the sheet rock and when I came back I found my cat hard at work where I left off:


That was all the motivation I needed to keep going with the project (although I decided it would be better to keep kitty in a different room while I worked so off he went). The tile came off easily enough and I was done in a relatively short amount of time. I then decided I would tear off the sheet rock. You know those TV shows where you see people busting through walls with hammers and everyone looks so happy because, well, demo work is fun right? Oh how I wish I could experience that feeling! I picked up a hammer and swung it as hard as I could at the sheet rock, fully expecting to blast out a hole the size of a basketball (or at least a golf ball) and nope. CLANG!!! It just bounced right off and made the loudest noise possible. Since we have neighbors sharing walls with us, I decided it would be best to not continue with this method. And since it was also past the hour of noise-making (one thing house owners don't have to worry about as much) I called it quits for the night.


The next day I woke up to a surprise visit by my parents! They came up to help me with the rest of the demo work (what a nice thing to do huh?)


And we left off with a clean slate:


I'll be back to share more soon!

P.S. I put the old fireplace mantle on Craigslist for free and found a new home for it the same day. Woo hoo!

Oct 1, 2010

Entryway: Drum Shade Tutorial

Hello everyone! Today I thought I'd share how to make a super easy drum shade using some fairly inexpensive materials.


I can't take credit for the idea on this one. My inspiration first came from Young House Love, when they shared how they added a drum shade to one of their existing lights. I didn't have the same type of light they had with that handy finial on the bottom, but it got my wheels turning. I went out in search for a shade but couldn't find one that was large enough for a reasonable price. As luck would have it, Sherry and John soon shared a blog by a handy gal who made a beautiful drum shade for her dining room. Her tutorial seemed easy enough to follow so I got to work (my tutorial deviates slightly).

1. I found an 18 inch embroidery hoop at Joann Fabrics and after a 40% off coupon it was only $2.62. I chose to buy only one, figuring I could use the two wooden pieces for the top and bottom of the shade. The burlap came from Ben Franklin's (since Joann's was out of that warm caramel color) and while it was quite a bit pricier ($6.29/yd vs. roughly $2/yd at Joann's) I had a store credit.  I bought 2 2/3 yds. because I would need 58 inches of fabric to cover the hoops.

2. I removed the screws on the hoops and used a butter knife to work the wooden block off of the hoops. It didn't take long, but I tried to be very careful because the hoops are a bit fragile.


 3. I glued the ends together using a dab of hot glue.

 4. I wanted a 9 1/2 inch tall drum shade (to allow room for the door to swing open without hitting it). I allowed an extra inch on each side for overlapping and cut a long strip of burlap at 11 1/2 inches wide.


 5. I couldn't find plexiglass or overhead sheets anywhere so I decided to use 80lb card stock I had on hand to make the shade stable. I taped 6 sheets end to end (not overlapping) to make one long piece and trimmed the excess.


6. I attached the top and bottom hoops to my paper strip using hot glue. Here's where I should have stopped to rework one part. Because the embroidery hoops were slightly different sizes, there was a taper to the shade and the paper did NOT want to cooperate. I should have gone back and cut down the larger hoop just a tiny bit until it was the same size as the other. But being my silly self I forged ahead anyway, dents in the paper and all.


7. I attached the burlap to the shade using a line of hot glue around the wooden hoops, making sure to leave an even amount of overlap on both sides.


8. I folded the edges over and glued them down, making sure to pull tight so there weren't any wrinkles.


9. Once I was finished, I cut off the excess fabric, leaving just enough to fold over and glue down.


10. I had purchased some ceiling hooks and eye hooks to hang up the shade. I figured this was a great solution for apartment dwellers and home owners alike because the hooks cause very little damage and the holes are easy to fill in should you need to move.

Well, what I failed to take into account was the length of the hooks once the shade was hanging. Once I had it up I realized the door could freely bash into my new project however much it pleased. Whoops! So here is the "behind the scenes" shot of my remedy. The eye hooks had once been pointing upwards, so I turned them upside-down (I just used hot glue to attach them). The ceiling hooks were now too far off from the eye hooks and not wanting to re-glue anything or put more holes in the ceiling, I used some thin wire to attach the two.


12. All done! I'm happy about the fact that you can barely see the hooks coming down from the ceiling (even though the inside is a different story), and I love that the paper diffuses the light. A word of warning though, I would NOT use paper if your shade is going to be close to your lights because it could become a fire hazard. I made sure to test out the heat of the light over time, and thankfully the shade is large enough and enough heat escapes through the top that the paper stays quite cool.

In the future, I'd like to add a diffuser to the bottom made of white muslin to hide the mess going on inside, but I'll have to re-work the hooks so that the shade can easily be hung and removed. Since it's so close to the door, most people walk right past it without stopping underneath to inspect my cob-job anyway, so I'm ok with it. :)

I can see doing this again too, it was really easy and I have enough burlap leftover to make another.


Materials:
2 2/3 yds burlap = $11.49 (Yikes! But I had a $7.50 store credit)
1 Embroidery hoop = $2.62
Eye hooks - $1.09
Ceiling hooks - $2.18
Wire - approx $2

Total = $19.38 (Not bad for under $20 huh?)
If you buy burlap at Joanns and don't use wire to hang up your shade then this project should only cost about $10-15 (with muslin added in for a diffuser). For a shade that big? So worth it!


Blog Widget by LinkWithin