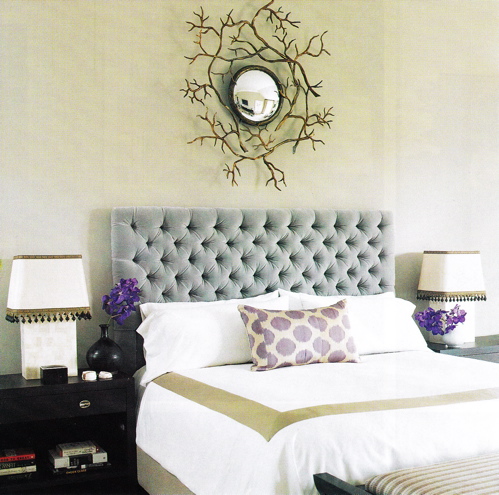
When looking at the after photo of my mini office makeover I realized that the space was reading more like it belonged in a kid's room than an adult's (or at least that's how I was seeing it anyway). Here's a little mirror project I did to give it a bit of glam and a more "grown up" feel.
Bellacor ($698)
image via Decorpad
image via Aussie Vogue Living via Coco + Klley
To start, I began by taking a walk in the woods and collecting sticks from the ground (it really helped that we had a windstorm come through the week before!) I gathered a small pile and got to work breaking the branches up into smaller, more manageable pieces.
I used one of the medium sized mirrors from the pack of 5 that I got from Home Depot and placed the sticks around it until I was happy with the result.
Then I broke out the hot glue gun and began gluing the sticks together in place, trying not to let too much glue glob up and show.
By the time I was finished, I had a "frame" that could be held up. I flipped it over and added extra glue to the backsides of the sticks to reinforce them all.
Then it was time to paint the whole thing. I taped off the mirror...
...and used Rustoleum's specialty metallic gold spray paint, thanks to Bryn Alexandra's recommendation.
I gave the branches a coat on both sides and did two coats on the mirror, no primer needed. I was really happy with how it turned out, it really reminded me of metal. Because the branches that actually touch the mirror are a bit fragile, I decided to hang both pieces up separately. The mirror already had a hook on the back for hanging and after I got that up I used a nail to hang up the branch part and overlapped it on the mirror.
I was surprised by how quickly this project came together and in the end it cost me less than $20 ($15 for the 5 mirrors and $3-4 for the spray paint). I'm hoping to show an updated photo of the office with the mirror in it soon, once I finished up a few things!


love that!
ReplyDeleteThis is great! I Definitely must make this.
ReplyDeleteIt's beautiful!
ReplyDeleteLOVE, except love isn't even a strong enough word! I need one of these in my house! Thanks for the awesome tutorial!
ReplyDeleteThanks for the inspiration. One more idea to add to my mirror obsession!
ReplyDeletewww.ajbarnesonline.blogspot.com
I love the mirror- it's glam and rustic at the same time! I just found your blog through your etsy site (I'm ordering the two dog silhouettes and faux bois) and now I'm a follower :)
ReplyDeleteWow, that really came out nice. I may try it for above my bed.
ReplyDeleteHello! I featured your gold mirror tutorial in my monthly blog series, Get Your Color On!. Each month I select a color, provide tips on how to decorate with it, and feature other bloggers with their projects that relate to this color.
ReplyDeleteThis month’s post is all about silver and gold, so I featured your mirror because I loved how you repurposed something so earthy to create something so glam.
Feel free to grab a Get Your Color On! featured button and check out my post at Get Your Color On! Silver & Gold. Thanks for sharing your amazing creativity!
We featured this along with 26 other gold inspired crafts in our DIY Craft Round-Up. Such an awesome idea!
ReplyDeletehttp://www.goedekers.com/blog/weve-gold-digging/
This is wonderful! Thanks for the instructions and spraypaint recommendation.
ReplyDeleteLoved this article! A mirror is definitely more than reflection; it’s décor. I found Vibecrafts offers some stunning mirrors that beautifully combine functionality with style for modern homes
ReplyDeleteGreat post! A well-placed mirror can instantly brighten and open up any room. I’ve recently explored Vibecrafts’ collection, and they offer some really elegant mirrors that blend décor and function beautifully. Highly recommended for modern homes.
ReplyDeleteGreat post! I agree that a mirror is much more than just a reflection tool. It can completely change how a room feels. I recently came across Vibecrafts’ collection of decorative and wall mirrors, and they have some amazing designs that make interiors look brighter and more stylish.
ReplyDeleteI really liked the way you explained the role of mirror in home décor. They truly make a room brighter and more welcoming. Recently, I explored Vibecrafts’ mirror collection and found some amazing designs both decorative and functional that can easily enhance modern interiors.
ReplyDelete